- Home
- Latest News
Secrets for a Perfect Shop Layout2016-04-12
 |
| Tight on work space? In this edition of Kreg Plus, we’ll discuss ways you can gain some extra space in your garage or shop through a more efficient setup of your workbench, power tools and more. |
“Shared Space” Shop
|
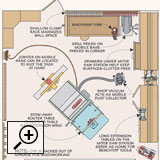
If woodworking isn’t the only thing going on in your work space, it is important to keep the layout flexible. You can do this by dividing your space into zones. The garage shown here is a great example. One side provides storage for household items, while the other side is devoted to woodworking. Perhaps your garage or shop includes space where you can permanently house larger items like a workbench, a drill press, and a miter saw station, which you can use as a secondary work surface. It’s also an ideal place to use benchtop tools. Other (portable) items can be stored away when not in use.
 |
|
Flexible Middle
|
The upside of a zoned arrangement is that it leaves plenty of room for the car. But, when the car is backed out, the space can be used to put larger power tools (table saw, jointer, drill press, etc.) to work. Outfit your tools with mobile bases and casters to make setting up shop easy. Then, when the work is done, simply park your tools back in place to make room for the car again.
 |
|
Effective Tool Groups
|
| Perhaps you have a dedicated workshop, but it’s small. Figuring out the best “combos” for grouping and arranging your tools will make your shop easier and more efficient to work in. The idea is to arrange your tools in small groups. Below we highlight a handful of solutions that may help you get more out of your shop space. |
Central Workstation
|
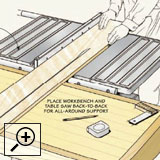
Place your table saw and workbench back-to-back in the center of your workshop. That way, your bench can act as a large outfeed support for the table saw. Just make sure your bench is the same height or a bit lower than your saw. This makes it perfect for handling sheet goods. Another plus is that the combined size of the saw table and bench makes an extra-large glue-up and assembly station.
 |
|
Galley Setup
|
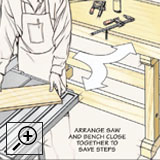
Another option is to place the workbench behind the saw, separated from one another so that you can work between them—like working in a galley kitchen. With this setup, you can use your bench as an infeed table to support long boards and large sheets of plywood.
 |
|
Prep Tool Duo
|
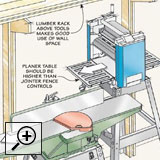
Another set of tools that works well together is the planer and jointer. While they’re not “everyday” machines, they can see some pretty heavy use at the beginning of a project. A smart way to position them is together along a wall close to your lumber rack.
 |
|
Shaping & Drilling Trio
|
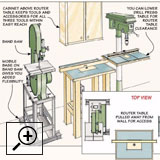
Another grouping that works well is the band saw, drill press, and router. While this trio may seem like an odd mix, there are a couple of reasons why these tools work well positioned close together. First, each of them works well placed against a wall. Since the router table is typically lower than the band saw and drill press tables, it gets positioned between the two. That way, it can serve as a handy work surface for holding parts or accessories while you’re working at the drill press or band saw.
 |
|
A Truly-Efficient Shop
|
| Try not to see tools as stand-alone equipment. Look at how they work together, as well as how they fit into your workspace. Ultimately, this will save you space, time, and trips across the shop. And, after a tool shuffling or two, you may even feel like you have a whole new place to work. What a great feeling! |
From: ©2015 Kreg Tool Company. All rights reserved. www.kregtool.com